Many independent developers may be unaware of the benefits of source control, which is primarily used in team settings. However, even if you don’t work in a team setting, source control can make your life a lot easier by expediting mundane tasks such as backing up and restoring files.
Git is quickly becoming my preferred method of source control. With a rudimentary understanding of shell commands, it’s really easy to set up a new repository or clone an existing repository to another computer.
To use Git, the first thing you’ll need to do is download and install Git. Depending on which hosting service you’re using, you may need to do some additional configuration. If you’re using GitHub, you can find the directions here. (Make sure you choose the correct platform at the top of the page! This threw me off for a long time.) Instead of GitHub, you can use Bitbucket, SourceForge, or any other hosting service that supports Git.
EDIT 7/27/2012: This article has been updated to reflect the latest Git and GitHub documentation.
How to set up a new repository
Step 1: Create a new remote repository
Here’s a screenshot of me creating a new remote repository on GitHub:
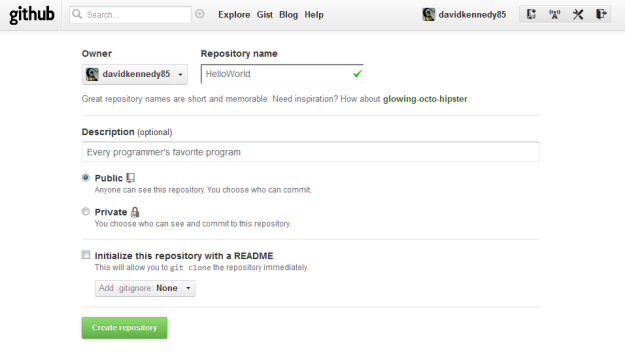
I imagine this process is fairly similar on other hosting services.
Step 2: Set up a new local repository
Create a new local directory from Git Bash, Explorer, Finder, or whatever your shell of preference is. If you’re doing it from Git Bash, the command is:
mkdir HelloWorld
Next, open Git Bash (if you haven’t already), change into the directory you just created, and initialize a new local repository:
cd HelloWorld
git init
The git init command will create a .git directory inside of your local directory. Don’t touch it.
Step 3: Point your local repository to your remote repository
The following command will create a new remote under the alias “origin”:
git remote add origin https://github.com/Octocat/HelloWorld.git
… where Octocat is your username, HelloWorld.git is your remote repository, and github.com is your remote server. If you’re using Bitbucket or another hosting service, this will be different. It is not necessary to use the alias “origin” here, but you must specify an alias.
At this point, you can begin creating, editing, deleting, and renaming files in your local directory. New files will be un-tracked by your local repository until you add them.
Step 4: Add your files to your local repository
Once you have some files in your local directory, you can add them one at a time to your local repository in Git Bash like so:
git add README.md
… where README.md is the name of your file. You can also add all your files to your local repository at once:
git add -A
Once you’ve added your files to your local repository, they are being tracked. Your remote repository doesn’t know anything about them and won’t until you push the changes you’ve made. But, first, you have to commit (stage) your changes.
Step 5: Commit (stage) your changes
This step is fairly self-explanatory, but I’ll attempt to explain what a commit is. Before I started using source control, while I was working on a project, I would zip all of the files in my project regularly during development. If I ever needed to revert a file to a previous version, I would open up one of these zip archives, find the file I needed to revert, and copy its contents into the current working version of the file. A commit works sorta like one of these zip archives, except it only archives the changes you’ve made since the previous commit.
Another way of explaining what a commit is can be found in the GitHub documentation:
Think of a commit as a snapshot of your project — code, files, everything — at a particular point in time. After your first commit git will only save the files that have changed, thus saving space.
With that in mind, commit your changes in Git Bash like so:
git commit -m 'First commit'
The part in quotes is a comment, so make sure it accurately reflects the changes you made.
Step 6: Push your committed changes to your remote repository
At this point, your remote repository is still oblivious to your changes. You need to update it by pushing the commit you just created to it:
git push origin master
… where “origin” is the alias for your remote and “master” is the branch you are working in. You can create a different branch and push to it instead, but I won’t cover that in this article. Once your committed changes have been pushed to your remote repository, you or anybody else can view and download your files from GitHub or whatever hosting service you’re using.
Any time you make changes in your local repository, you’ll have to add your files again, commit (stage) your changes, and push your committed changes to your remote repository. Instead of adding and then committing your changes every time, you can do both steps at once:
git commit -a -m 'Made some changes'
… followed by the git push command. Keep in mind that this only works on files that have already been added and are being tracked by your local repository. New files must be added initially using the git add command.
Here’s another handy tip: You can set up your local repository to always use the “origin” alias and “master” branch like so:
git push -u origin master
After this, you can use the git push and git pull commands from this repository without typing the alias or the branch every time.
How to clone an existing repository
One of the most obvious benefits of source control is the ability to edit files on multiple computers and keep them all up to date. If you want to do this, then you’ll need to clone an existing repository.
As an example, here’s how to clone our existing repository from earlier:
git clone https://github.com/Octocat/HelloWorld.git
Now, we have two local repositories on two separate computers, both pointing to the same remote repository. Again, any time you make changes in any of your local repositories, you’ll have to add your files again, commit (stage) your changes, and push your committed changes to your remote repository. Then, to update your other local repositories, you’ll have to pull any changes from your remote repository using this command:
git pull
There’s no need to type the alias or the branch here because the git clone command automatically sets up your local repository to always use the “origin” alias and “master” branch.
Conclusion
Hopefully, this article helps someone else get started using Git and away from using zip archives. For more on Git, please see Git Reference or the Pro Git Book.

